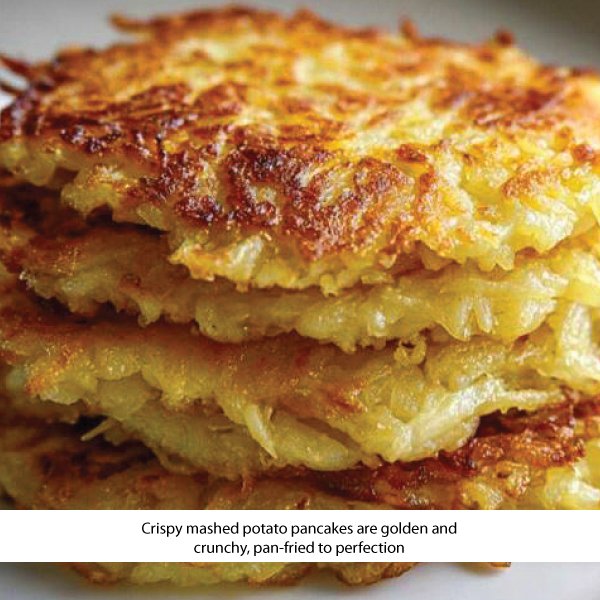
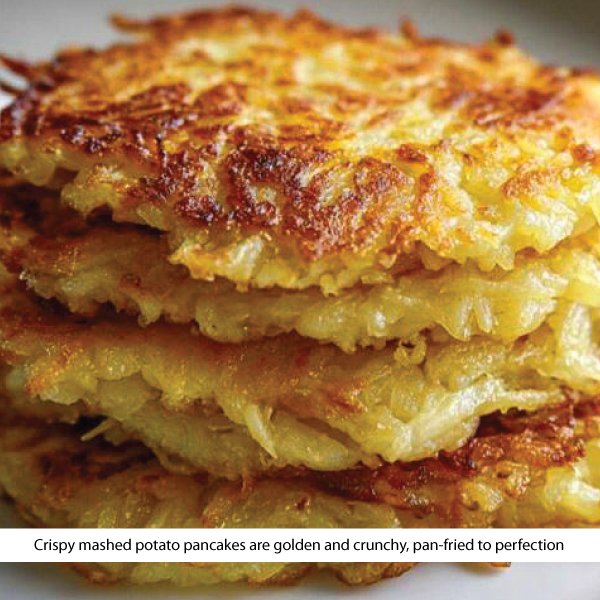
Ever stared at a plate of leftovers thinking, “There must be a better way than the microwave”? Well, there is. Crispy Mashed Potato Pancakes (they’re also known as ‘potato cakes’ or ‘latkes,’ a chummy cousin) are the greatest way to turn last night’s leftovers into a transcendent gourmet affair. We’re talking about the crunch you can feel as you notice it, and an interior that is a total pillow of Potatoy softness.
For Sunday brunch or Wednesdays when you wanna, this ain’t no side dish.
Recipe Overview
- Prep time: 10 minutes
- Cook time: 10 minutes
- Total time: 20 minutes
- Servings: Makes about 8–10 pancakes
- Course: Appetizer / Side Dish / Breakfast
- Cuisine: American / Comfort Food
What This Recipe Is
Let’s say you’re taking leftover mashed potatoes to the next level. You know, instead of sad noodle-arm microwaving cold fluffy potatoes in a sad soggy bowl, you’re making Crispy Mashed Potato Pancakes.
You’ll combine yesterday’s potatoes with an egg, some flour, and a sprinkle of cheese, and fry it all up into a crunchy-on-the-outside, melty-on-the-inside “dough”. The edges get extra crisp—like shattered glass crunchy—while the center stays pillowy smooth. Part pancake, part hash brown, these crispy bad boys are the best of both worlds. Delicious AND easy.
Why This Recipe Is Special
Get ready to repurpose those leftover mashed potatoes. Watch how they magically change right before your eyes. There’s just one thing you should know about this recipe. It makes your leftovers BETTER than your actual dinner.
It’s smart. Rich meets rasty and crispy. You are essentially frying mashed potatoes until crispy. It’s smart because you probably have all these ingredients on hand RIGHT NOW. Makes you feel like a real culinary genius. Plus, it makes a simple side into something you’ll crave.
Why You’ll Love This Recipe
You’ll LOVE this recipe for leftover mashed potato pancakes. Here are eight realistic reasons why.
Rescue Leftovers: This is how you give leftover mashed potatoes a “makeover”.
Texture Explosion: Who doesn’t love a crispy exterior with a light and buttery interior?
Budget Friendly: Odds are you have all of the ingredients (eggs, flour, cheese) already.
Ready in Minutes: These come together in about 20 minutes.
Extra Versatile: Load them up with bacon bits, green onions, jalapeños…whatever you have leftover!
Kid Friendly: Children who love anything fried and cheesy.
Easy Cleanup: Cook them up in one skillet.
Mix and Match: Serve with eggs for breakfast, or as a side to steak, or eat straight out of the pan at midnight.
One-Pan Wonder: You only need one skillet to fry these up, which means way fewer dishes to wash later.
Works for Any Meal: They’re just as good with eggs for breakfast as they are as a side dish for steak or a midnight snack!
Ingredients
3 cups Leftover Mashed Potatoes. Cold is easier to shape here.
1 Large Egg, lightly beaten (Eggs work like “glue” here.)
½ cup All-Purpose Flour (+ extra for dredging if you desire extra crunch)
½ cup Shredded Sharp Cheddar (Because…well, cheese.)
2 tbsp Chopped Chives or Green Onions
½ tsp Garlic Powder
Salt & Black Pepper, only a little or to taste. Don’t forget leftover potatoes are already seasoned!
2–3 tbsp Vegetable Oil (or butter/bacon grease for frying)
Instructions:
1. In a large bowl, mix your chilled mashed potatoes, egg, flour, cheese, chives, and garlic powder. Stir until combined, forming a thick dough.
2. Form into patties. Use a 1/4 measuring cup to scoop out some dough and roll it into a ball. Flatten the ball into a patty shape about 1/2 inch thick.
o Tip: If your dough is too sticky to work with, add some flour to your hands!
3. Heat oil in a large nonstick skillet over medium heat.
4. Place 3–4 patties in your skillet and fry for 3–4 minutes on each side, or until deep golden brown.
5. Place on a paper towel-lined plate for a minute to drain. Top with a pinch of flaky salt while they’re hot!
Nutritional Information (Per Pancake)
- Calories: 145 kcal
- Protein: 4g
- Carbohydrates: 18g
- Fat: 7g
- Fiber: 1.5g
Tools you’ll need:
You don’t need a fully equipped gourmet kitchen to make these. Simply follow this short list:
Non-Stick skillet (preferably large): Non-stick is best for these; nothing worse than stuck pancakes! If you happen to own a cast-iron skillet, that is ideal. Cast iron will give you the extra-deep golden crust we are going for.
Flat spatula: Thin-edged so you can slide under the pancakes easily.
Mixing bowl: Big enough for you to be able to mix.
Variations and customizations:
Best of all, you can pretty much empty your fridge making them. Here are some variations you can try:
Loaded baked potato pancake: Add cooked crispy bacon bits to the batter. Top your finished pancakes with a hefty spoonful of sour cream.
Take a trip down the spice route: Love spicy? Add some diced jalapeños to the batter and substitute pepper jack cheese for the cheddar.
Go Greek: Substitute crumbled feta cheese and dried oregano for the cheddar and chives for a fresher taste.
Make it vegan: Substitute a “flax egg” for the egg and add nutritional yeast or your favorite dairy-free cheese shreds.
Creative twists:
Want to step things up a bit and skip the skillet? Throw. Pour your potato mixture into a generously oiled waffle iron. Make delightful Potato Waffles that are full of those great deep crannies just waiting for extra syrup, gravy, or oozy egg yolk.
Some more tips for Waffling Potatoes:
• Generously oil (or butter) the waffle iron before cooking each waffle. Potatoes will stick like nothing else.
• Let them cook longer than you would a normal flour waffle. You want the outside of the potato waffle to get crispy so that when you lift the lid of the waffle iron, it won’t fall apart.
• FYI, if you add EXTRA Cheese to your potatoes, try to keep most of the cheese contained within the potato “dough”. It melts deliciously onto the waffle iron – but is kind of gooey and hard to clean up!
• Avoid crowding your waffles: If making multiple batches of potato waffles, keep finished waffles in a warm oven on a wire rack set over a baking sheet at 200 degrees F or 90 degrees C so they stay crisp as you work.
Helpful Cooking Tips & Pro Tips:
* Keep Everything Cold: Please don’t skip this step! The potato mixture must stay cold. Cold starch holds up better than when it’s warm. If your potato mixture is at room temperature when you cook it, the pancakes will fall apart because the starch will become mushy. Cold potatoes right out of the fridge are best.
* Mayo Barrier: For an extra crunchy crust that prevents sticking, swipe a little mayo on the outside of the patty before placing it in the hot oil.
* Patience is Golden: Resist the urge to flip too soon. Let the pancake cook for several minutes without moving until you see the edges turn that gorgeous golden brown color. If you try to flip the pancakes too soon, they will fall apart.
* Do Not Overmix: When you add your flour and egg, just mix until everything is combined. If you overmix the potatoes, they will become “gummy”. Nobody likes gluey potato pancakes.
* Do a Test Run: Before you begin frying all of your potato pancakes, drop a small “tester” spoonful into the oil to make sure it stays together. If it doesn’t, add another tablespoon of flour and try your test run again.
* Cooling Rack: Cool them on a wire rack instead of putting them directly on a plate or they will lose their crispness.
Mistakes to avoid:
Don’t worry—even professional chefs have difficulties with these now and then. Here are some solutions to the most common mistakes people make when cooking potato pancakes:
Don’t Go Overboard with the Flour: It’s easy to just keep adding flour if your batter seems sticky. Too much flour will leave you with a bread-like pancake instead of potato-fluffy ones. Add flour, tablespoon by tablespoon, until they barely hold together.
Don’t Crowd the Pan: We know, we know. You want to make these ASAP and dig in. Trust us, crowding the pan is the quickest way to soggy potato pancakes. When you overcrowd the pan, the oil temperature plummets, and your “fry” becomes a soak. Allow them to fry in batches with room to spare!
Add Enough Oil to the Pan: Remember, we aren’t deep frying. But you do want to add enough oil so that the pan is coated. If there isn’t enough oil, the outsides will burn before they can develop that nice, even crispness.
The “Damp Hands” Mistake: If your potato mixture is sticking to your hands when you’re forming your pancakes, don’t keep sprinkling flour on the mixture. Dampen your hands with water or a spritz of oil instead. The pancakes will release easily from your hands with no sticky situation.
Mind your Heat: High heat will burn the outside while leaving you with a cold middle. Low heat will leave you with greasy potato pancakes. Use medium heat and allow your pan to heat up before adding your first pancake.
Serving ideas
Now that you have your pancakes nice and crispy, you will need to figure out how you want to serve them! Here are 6 fun ideas:
Classic Brunch: Serve them like a latke hash brown with a poached or fried egg on top. Let the yolk run all over the potato pancake. Add a few slices of bacon on the side, and you have one delicious breakfast that will knock your diner Sundays out of the park.
“Fancy” Appetizer: Serve these as appetizers when friends come over! Make them small and add a dab of sour cream and a sprinkle of fresh chopped chives on top. Want to get REALLY fancy? Add a tiny piece of smoked salmon on top to resemble upscale finger foods!
Serve as a Dinner Side: These go great with pot roast or grilled chicken breast. Instead of serving a scoop of bland mashed potatoes, try serving these pancakes on the side instead to soak up all that gravy or pan drippings! They add a nice crunchy texture to any dinner plate.
Give Them the “Loaded” Treatment: Think BAKED potato! While they’re still hot, pile on shredded cheese, real bacon pieces, and a scoop of Greek yogurt (or sour cream) for dipping. This kid pleaser is always a crowd favorite.
Sweet Meets Savory: These also taste amazing served “Latke style” with applesauce on the side. Trust me! The sweet apple with the salty onion potato is a match made in heaven, and you’ll want to start making them this way every time once you try it.
Steakhouse Style: Serve these next to a filet mignon with a large scoop of garlic butter melting on top. As the butter melts into the crispy layers, it makes them taste beyond decadent.
Common Questions (FAQ)
Got questions about how to make potato pancakes? I’ve got answers! Below you’ll find answers to the most commonly asked reader questions regarding turning leftover mashed potatoes into crispy deliciousness.
Can I make these with instant potatoes?
You sure can! Instant potatoes generally have a looser consistency than homemade mashed potatoes, so if you’re starting with instant potatoes made specifically for this recipe, reduce the water or milk you use to make the potatoes. They should be as stiff as possible without being dry; if they’re too loose, they’ll just fall apart when you cook them.
Why are my potato pancakes falling apart?
This is by far the most common complaint about potato pancakes! There are two likely culprits: your potatoes were too warm when you mixed everything (transfer your potatoes to the fridge while you prep your other ingredients; super cold potatoes bind the best! ), or your potato mixture needs something to help it bind. Add an extra tablespoon of flour or an extra egg yolk to help keep your pancakes together.
Can I bake these instead of frying them?
Sure! Although they won’t have that glorious “glass-shattering” crispness that a good pan-fry will give you. To bake instead of fry, place your potato pancakes on a greased baking sheet and bake at 400°F (200°C) for 10–15 minutes per side, spraying the tops with cooking spray or oil to prevent them from drying out.
Can I use leftover mashed potatoes that already have milk and butter mixed in?
You totally can! In fact, most leftover mashed potato mixes already have the “good stuff” incorporated. The only thing to keep in mind is that if your leftover mashed potatoes are exceptionally creamy or buttery, you may need to add an extra tablespoon of flour to absorb excess moisture and prevent the potato dough from being too sticky.
Can I make gluten-free potato pancakes?
Yes! Simply substitute the all-purpose flour for your favorite 1: 1 gluten-free flour blend, or for cornstarch or almond flour. Because the potato plays such a large role in this recipe already, it’s an easy substitution that tastes just as good.
How do I keep potato pancakes crispy after I’ve finished cooking them?
No one wants a lukewarm potato pancake! As you complete batches, transfer finished pancakes to a wire rack set over a baking sheet and keep warm in a 200°F (95°C) oven. Keeping them on a wire rack instead of directly on the baking sheet allows air to flow through and prevents soggy bottoms.
Storage and Make-Ahead
A few things I love about these Crispy Mashed Potato Pancakes? They are so meal-prep friendly! Whether you want to whip up a giant batch to have throughout the week or save some as a midnight snack, let me break down for you how to store them and prep them like a pro.
Make Them Ahead
Yes! In fact, making these ahead of time can really simplify things.
Mix the “Dough”: Feel free to combine your potato, egg, and flour mixture up to 24 hours in advance. Cover with a lid or plastic wrap and store in the refrigerator.
Form the Patties: For overachievers, you can even go ahead and form the patties into shape and lay them on a parchment-lined tray. Cover tightly with plastic wrap and keep in the fridge. When you’re ready to make breakfast or dinner, simply grab ’em and toss ’em in the pan!
Storage Tips
Made too many? Or hungry for breakfast at midnight? Don’t stress if you have leftovers. Store them just as you would store regular pancakes.
Refrigerator: Allow the pancakes to cool completely. Layer them in an airtight container. Here’s a pro tip: separate each layer with a piece of parchment paper or paper towel. This helps prevent them from sticking together and absorbs any excess moisture so they don’t become soggy. They will last in the fridge for 3 to 4 days.
Freezer: Like most foods, these freezer fab-u-lous! Freeze the pancakes in a single layer on a baking sheet (this is called “flash freezing”) and then transfer to a freezer bag. They will last for up to 2 months.
Reheating Tips (To preserve the crunch!)
DO NOT MICROWAVE! You’ll end up with a soggy, chewy pancake that nobody wants to eat. While nothing will bring that crispy crust back to life, there are a few tricks to reheat your potato pancakes to resemble their “just-fried” state.
Air Fryer: Reheat in the air fryer at 350°F for about 3–5 minutes. They will taste just like you fried them!
Toaster Oven: Place in a toaster oven set to medium-high and bake until hot and crispy.
Skillet: Toss them back in a dry non-stick skillet over medium heat for 2 minutes per side. There’s no need to add oil because there should be enough residual oil left in the pancake to crisp it back up!
Storing Tip
Bonus round: If you’re reheating your potato pancakes from frozen, there’s no need to thaw them first. Just add a few minutes to your air fryer or oven time.
Ingredients to add to make Crispy Potato pancakes more delicious:
Want to upgrade those basic potato pancakes from meh to “Fight over these!”? Mix-ins! Mashed potatoes don’t have much flavor on their own, so it’s easy to add just about anything to them.
Here are 20 easy, practical, totally yummy mix-ins you can stir into the potato mash before frying:
Shredded Sharp Cheddar Cheese: This is the OG mix-in. Melts beautifully, and you get crispy, cheesy edges.
Bacon Bits: As if these needed an explanation. Make sure you’re using real bacon bits for a salty, smoky crunch in every bite.
Chopped Chives or Green Onions: Adds a bright “onion-y” pop that complements the richness of fried potato really well.
A Clove of Grated Garlic: Never use garlic powder. Just grate a whole clove into the potatoes for major flavor.
Sour Cream: (just a spoonful!) Stir a little extra sour cream into the potato dough, and the inside will be ultra creamy.
Cracked Black Pepper: It adds a wonderful “bite” to each pancake that you’ll crave.
Smoked Paprika: Stir in about a teaspoon for a nice reddish color and that deep, wood-fired flavor.
Parmesan Cheese: Extra salty + nutty = extra crispy potato crust.
Dried Oregano or Thyme: Delicious if you’re serving the pancakes with roast chicken or an Italian-style meal.
Finely Diced Ham: A great way to use up leftover meat from the deli counter, and turns your pancakes into a hearty meal.
Red Pepper Flakes: Because everything’s better with a little spice. Start with just a pinch!
Corn Kernels: Fresh or canned. Sweet corn pops surprisingly well with potatoes.
Everything Bagel Seasoning: Seriously. Go ahead and ruin your potatoes with garlic, onion, and sesame seeds. We won’t tell.
Caramelized Onions: Got some lying around in the fridge? Fold ’em in for a sweet + savory French-onion flavor.
Sauteed Mushrooms: Finely chop + brown first. Adds a wonderfully “meaty” texture, and makes veggie eaters happy.
Feta Cheese: Since it doesn’t melt all the way, you end up with little pockets of salty creaminess.
Finely Grated Zucchini: See tips below! Grated zucchini = easy way to hide veggies in your breakfast food.
A Dash of Hot Sauce: Stirred right into the potato dough. Gives each pancake a subtle spicy kick.
Lemon Zest: I know, I know…it sounds crazy! But just a tiny bit of lemon zest really makes your potatoes taste “bright”.
Leftover Gravy: If your mashed potatoes are on the dry side, mix in a spoonful of leftover gravy. Makes the centers super savory + moist.
Tip: Whatever you add, just be sure it’s drained and not TOO “wet”. (Watery veggies, for example.) If your potato mixture gets too wet, it’ll fall apart when frying.